
Introduction
There’s a specific kind of defeat that comes from pulling into your own driveway and not wanting to look at your front yard.
That was me. Every single day.
The bermuda grass had taken over completely, spreading into every corner, choking out anything that dared grow in its place. The weeds filled in whatever the bermuda missed. There was no color, no life, no sense that anyone actually cared about this space. Just a scrubby, overgrown mess that I had slowly stopped seeing because it was easier than feeling overwhelmed by it.
But something shifted. Maybe it was one too many scroll sessions through beautiful garden transformations. Maybe it was the Matilija poppy I’d been dreaming about planting. Whatever it was, I stopped avoiding the yard and started actually looking at it, really looking, and asking myself: what do I actually want this to be?
The answer came fast: I wanted flowers. Lots of them. I wanted color in July when the desert heat is relentless and most yards look scorched and defeated. I wanted to pull into my driveway and feel something good. I wanted a front yard that reflected what I actually believe — that beauty grows here, even in the heat.
So I got to work.
This post is the full story of how I transformed my front yard from an overgrown bermuda grass nightmare into a layered, blooming desert garden, completely DIY, from soil to Corten edging to wildflower seed mix. I’ll walk you through every step: clearing the grass, designing the beds, choosing the plants, and what’s blooming now that it’s all coming together.
If your front yard feels like a lost cause right now, I promise, it’s not. It’s just waiting for a little vision and a lot of elbow grease.


Setting the Vision: What Did I Actually Want?
Before I pulled a single weed or drew a single line in the dirt, I sat with the question that I think most people skip: what do I actually want this yard to do?
For me, the answer wasn’t complicated. I just hadn’t said it out loud yet. I wanted more flowers. More color. A front yard that looked intentional and alive, especially in the brutal stretch of summer when everything in the high desert is doing its best just to survive. I wanted people to drive by and see something blooming. I wanted to walk outside in the morning and feel like I was somewhere beautiful.
Curb appeal mattered, but it wasn’t the whole story. I also needed this yard to make sense for where I live. Ridgecrest is no joke in July. Whatever I planted had to be able to handle the heat, the dry air, and the kind of summers that send most ornamental plants into survival mode. Drought tolerance wasn’t a nice-to-have. It was the whole framework.
That meant letting go of the idea of a traditional lawn and leaning into something different: a layered mix of desert perennials and wildflowers, with existing trees like the crape myrtles and palo verde staying in place as anchors. Instead of grass trying to survive where it doesn’t belong, I wanted plants that were built for this climate and would reward me for it.
The vision started coming into focus: defined planting beds shaped by Corten steel edging, decomposed granite paths winding between them, and as much bloom and color as I could pack into the space, from early spring wildflowers all the way through the summer heat.
It sounds simple now. But getting from “I want more flowers” to an actual plan took some real thought. Here are the questions I’d recommend asking yourself before you start:
Before you relandscape, ask yourself:
- What’s not working about my yard right now, practically and visually?
- What’s my climate reality? What plants actually thrive here?
- Do I want year-round interest, or is there a peak season I’m designing toward?
- How much ongoing maintenance am I willing to do?
- What’s my budget, and am I doing this all at once or in phases?
- Are there existing plants or trees worth keeping and designing around?
Getting honest answers to these questions before you spend a dollar on plants will save you a lot of frustration later. The clearer your vision going in, the more intentional every decision becomes.
Step 1: Killing the Bermuda Grass and Clearing the Weeds
Let me be honest with you about bermuda grass: it is not going to go quietly.
This is not a pull-it-out-and-you’re-done situation. Bermuda grass spreads through underground rhizomes, horizontal root systems that run beneath the soil surface and can regenerate from even the smallest fragment left behind. You can remove every visible blade and think you’re finished, and three weeks later it’s back, pushing through your fresh mulch like nothing happened. It’s tenacious in a way that feels almost personal.
In the high desert, it’s an especially stubborn problem. Bermuda grass loves heat. It thrives in the exact conditions we deal with every summer, which means it had every advantage in my yard and it used all of them.
So before I could build the garden I wanted, I had to get serious about removal.
What I Did
My front yard had river rock, and the bermuda grass had worked its way completely through it, rhizomes threading between the rocks and pushing down through the landscape fabric into the soil beneath. That combination made it one of the more frustrating removal jobs I’ve tackled. There was no clean way to do it. I just had to get in there.
I cleared as much as I could manually, working section by section through the rock and fabric, pulling root runners and following them as far as I could into the hard desert soil. My go-to tool for this was my Japanese weeding sickle. It’s designed exactly for this kind of work, with a narrow curved blade that can dig into compacted ground and get underneath root systems in a way a standard hoe or hand trowel just can’t. If you don’t own one and you’re dealing with bermuda grass in hard soil, it’s worth every penny.
I’ll be transparent: I did not get every root. That’s not a failure. It’s just the reality of bermuda grass removal, especially when it’s had years to establish itself through layers of rock and landscape fabric. I did my best, and I’ve made peace with the fact that I will be combating regrowth for years to come. That’s just part of the deal when you inherit a yard that bermuda grass has claimed as its own.
Smothering What’s Left
Once the planting beds were cleared as thoroughly as I could manage, I laid cardboard directly on the soil before adding any amendments or mulch on top. Sheet mulching with cardboard is one of my favorite low-intervention techniques. It smothers any remaining rhizomes and weed seeds by blocking light and breaking down slowly into the soil over time. It won’t eliminate every trace of bermuda, but it gives your new plants a fighting chance in that critical first year while the cardboard does its quiet work underneath.
A few things that made manual removal more manageable:
- Water the area first. Moist soil makes it significantly easier to pull roots out intact rather than snapping them off and leaving fragments behind.
- Work in sections. Don’t try to do the whole yard at once. Clear a bed, get it ready to plant, then move to the next area.
- Follow the rhizomes. Pull slowly and trace the root runners as far as they go. The visible grass is not the problem. What’s underground is.
- Use the right tool. A Japanese weeding sickle is a game changer for hard, compacted desert soil.
- Expect regrowth. Even with thorough removal, some will come back. Stay on top of it early and pull new growth before it re-establishes.
A Note on Solarization
You’ll often see solarization recommended for bermuda grass removal, covering the area with clear plastic and letting the summer sun cook the roots over several weeks. And it does work. But I chose not to use it, and my reason comes down to soil health. Solarization kills indiscriminately. Yes, it takes out the bermuda grass and weed seeds, but it also destroys the beneficial microorganisms, fungi, and organisms living in your soil, the biological community that makes healthy plant growth possible in the first place. In a desert environment where building good soil is already a challenge, I wasn’t willing to sterilize what I had. I’d rather fight bermuda regrowth manually for a few seasons than start with dead soil.
If soil health matters to you, and I’d argue it should, sheet mulching with cardboard is a gentler, more soil-forward approach that works with your garden ecosystem instead of against it.
What I’d Tell Someone Starting This Step
Don’t rush it. The temptation to just start planting is real, especially once you have a vision in your head and plants waiting in pots. But bermuda grass that isn’t fully dealt with will compete with everything you put in the ground. Give this step the time it deserves, accept that it won’t be perfect, and know that the cardboard layered under your beds is working even when you can’t see it.
The clearing phase isn’t glamorous. There are no good photos of it, and it doesn’t make for exciting content. But it is the foundation everything else is built on, and doing it as thoroughly as you can makes every step after this one easier.
Step 2: Designing the Layout
Once the bermuda grass was cleared and the beds were layered with cardboard, I could finally start thinking about the fun part: what was this yard actually going to look like?
I didn’t hire a landscape architect. I didn’t use design software. I stood in my front yard and started making decisions based on how I actually lived in the space, which, honestly, is how most DIY garden transformations actually happen. If you’re waiting until you have a perfect plan to start, you’ll be waiting a long time.
But there was a clear order of operations, and getting that order right made everything else fall into place.
Start With How You Move Through the Space
The very first thing I planned, before I pulled a single weed or moved a single rock, was the walkways.
Not the plants. Not the beds. The paths.
I walked the yard and paid attention to where I naturally moved. Where did I go to get to the side gate? Where would I need to walk to reach plants for watering and maintenance? Where did my feet already want to go? I mapped those routes first, because a garden that fights how you naturally move through it is a garden you’ll stop enjoying very quickly.
Once the walkways were established in my mind, everything else followed. The planting beds were essentially the spaces left between the paths, shaped and defined by where I needed to walk, not the other way around.
Working Around What Already Existed
My front yard wasn’t a blank slate, and I didn’t treat it like one. There were existing elements that weren’t going anywhere, and rather than fighting them, I let them guide the design.
The large crape myrtle trees, established lantana bushes, and medium boulders throughout the yard were all staying. Some of those rocks weigh over 600 pounds. There was no moving them, so I stopped thinking of them as obstacles and started thinking of them as anchor points. The paths curved around them. The beds formed around them. What could have been a design problem became one of the most natural and characterful elements of the whole yard.
This is something I’d encourage any DIY gardener to embrace: work with what you have, especially when you have no choice. The constraints often become the best features.
Defining the Beds With Corten Steel Edging
With the walkways mapped and the anchor points established, the free-form beds took shape organically. The edging choice came later in the process, but when we landed on Corten steel, it felt immediately right.
My husband has been a Corten fan for years and has wanted to bring it into our yard for a long time. This project finally gave us the reason. Corten steel is a weathering steel that develops a rich, rusty patina over time, warm amber and burnt orange tones that look completely at home in a desert landscape. It’s durable, holds a clean edge, and ages beautifully rather than degrading.
The edging did several things at once: it gave every bed a defined shape, created a clear visual boundary between planted areas and paths, and added a design element that elevated the whole yard without feeling fussy or high-maintenance. It also keeps the decomposed granite in the paths where it belongs and out of the planting beds.
If you’re designing a desert garden and want one material choice that does the most visual work for the least ongoing effort, Corten edging is it.
Decomposed Granite Paths
Between the beds, I used decomposed granite for the paths. DG is a natural byproduct of weathering granite, a fine, gravelly material that compacts well underfoot and has a warm, earthy tone that feels right at home in a high-desert setting.
The practical reasons for choosing DG were straightforward: it’s permeable so water drains through rather than pooling, it suppresses weeds when laid over cardboard or landscape fabric, it’s low maintenance, and it’s significantly more affordable than hardscape options like pavers or concrete. The aesthetic reason was just as important. Decomposed granite gives the yard a natural, flowing feel that connects the whole design rather than breaking it up into hard lines.
Together, the Corten edging and DG paths gave the yard its bones. The plants fill in the beauty, but the structure is what makes it feel intentional.
Plants Came Last, On Purpose
The very last thing I decided on was what to plant. And I think that’s exactly the right order.
I had a few non-negotiables going in. The Matilija poppy had been on my list for years, and I knew I wanted wildflowers and desert perennials that could handle a Ridgecrest summer. But beyond those anchor ideas, I left room for inspiration. I waited until spring, walked through the nurseries slowly, and let the plants speak to me. Some of the best additions to this garden weren’t on any list. They just caught my eye and felt right for the space.
There’s something to be said for having a strong design structure in place before you ever set foot in a nursery. When the bones are solid, you can be loose and intuitive about the plants. The structure holds everything together while the plant choices let you be creative and spontaneous.
A Simple Approach to Sketching Your Own Layout
You don’t need design software or graph paper to plan a front yard. Here’s what works:
- Walk your space first. Notice where you naturally move and where you need to access for maintenance. Start there.
- Mark your anchors. Existing trees, large shrubs, immovable rocks, or any fixed structures go on your plan before anything else, then design around them.
- Let paths define your beds. Draw your walkways, and the planting beds will take shape in the spaces between them.
- Choose your edging and hardscape next. These are structural decisions that should come before plant shopping.
- Pick plants last. Give yourself permission to be inspired at the nursery once the structure is set.
The goal isn’t a perfect blueprint. It’s enough of a plan that you’re making intentional decisions rather than impulse ones, and a structure solid enough to hold whatever plants you fall in love with along the way.
Step 3: Plant Selection
This is the section I could talk about forever, because choosing the plants was genuinely one of the most enjoyable parts of this whole project. Once the structure was set and the beds were ready, I gave myself permission to be inspired. I walked through nurseries in the spring, paid attention to what stopped me in my tracks, and built a plant palette that felt layered, colorful, and alive.
The goal was simple: something blooming at every level, in every season I could manage, in colors that made me happy every time I pulled into the driveway.
Here’s what ended up in the ground.
Wildflower Seed Mix: The Heart of the Beds
The wildflower seed mix was the foundation of the whole planting scheme. Rather than filling every inch with transplants, I seeded large areas of the beds with a mix that included:
- California poppies: the quintessential desert wildflower, brilliant orange, nearly effortless to grow from seed in our climate
- Icelandic poppies: cool-season bloomers with tissue-paper petals in sherbet colors, planted for early spring color before the heat sets in
- Cornflowers: deep cobalt blue that contrasts beautifully against warm desert tones
- Rudbeckia: golden yellow daisy-like blooms that carry through summer heat with ease
- Gaillardia: fiery red and orange blooms that are practically built for desert conditions
- Coreopsis: cheerful yellow flowers that bloom prolifically and need very little water once established
Seeding a wildflower mix gives the beds a naturalistic, cottage-garden feeling that you simply can’t replicate with transplants alone. It fills space quickly, attracts pollinators from the start, and creates that layered, abundant look that makes a garden feel like it’s been there for years.


Desert and Heat-Tough Perennials: The Backbone
These are the plants doing the long-term work, coming back year after year, filling in the beds with reliable color and structure across the seasons.
- Salvia: a workhorse in any desert garden, loved by hummingbirds, drought tolerant, and available in a range of colors from deep purple to coral red
- Penstemon: tall, tubular blooms in pink, red, and purple that are native to the western U.S. and built for exactly our conditions
- Yarrow: flat-topped clusters of flowers in yellow, white, and pink, incredibly drought tolerant and a magnet for beneficial insects
- Echinacea: bold, daisy-like coneflowers that bloom midsummer and provide seedheads for birds through winter
- Lavender: fragrant, silvery foliage and purple blooms that thrive in heat and poor soil
- Sedum: low-growing succulent groundcover that fills gaps beautifully and needs almost no water once established
- Aster: a late-season bloomer that extends color into fall when most other plants are winding down


Showstopper Blooms: The Statement Plants
Every garden needs a few plants that make people stop and stare. These are mine.
- Matilija poppy (Romneya coulteri): the one I’d been dreaming about for years. Enormous white flowers with crinkled petals and a golden center, sometimes called the fried egg flower. A California native that thrives in exactly the dry, rocky conditions of the high desert. This plant is a statement in every sense of the word.
- Yellow bird of paradise (Caesalpinia gilliesii): a dramatic, airy shrub with bright yellow blooms and long red stamens that absolutely light up in summer. Heat loving, drought tolerant, and stunning.
- Tecoma orange bells: a vigorous, trumpet-flowered shrub in deep burnt orange that blooms heavily in summer heat and attracts hummingbirds constantly
- Chocolate cosmos: deep burgundy-brown flowers with a subtle chocolate scent, unusual, beautiful, and a wonderful contrast against brighter colors
- Strawflower: papery, jewel-toned blooms in crimson, gold, and copper that hold their color even when dried, long blooming and incredibly heat tolerant


Annual Color and Filler: The Seasonal Layer
Annuals are what give a garden that full, lush feeling, especially in the first year when perennials are still establishing. I used them generously to fill gaps and add concentrated color throughout the beds.
- Marigolds: reliable, pest-deterring, and available in every warm tone imaginable
- Zinnia: one of the best heat-tolerant annuals you can grow, blooms prolifically all summer
- Celosia: velvety, flame-shaped blooms in deep red, magenta, and gold that add incredible texture
- Angelonia: sometimes called summer snapdragon, delicate spikes of bloom that hold up beautifully in heat
- Lisianthus: elegant, rose-like blooms that look far more high-maintenance than they actually are
- Star of Madeira (Echium candicans): towering spires of blue-purple flowers that create dramatic vertical interest and are beloved by bees


The Existing Trees: Anchors and Overhead Structure
These were here before the redesign and will be here long after. They’re not supporting players. They’re the reason the whole yard has the structure it does.
- Crape myrtle: already established and thriving, the crape myrtles exploded with blooms this summer in a way they never had before. The relandscape gave them better conditions, less competition, and room to finally show off what they’re capable of.
- Palo verde: one of the most beautiful desert trees in existence. Green bark, feathery foliage, and clouds of yellow flowers in spring. It provides filtered shade over parts of the bed without blocking enough light to hurt what’s growing beneath it.

A Note on Plant Layering
The reason this plant list works as a garden rather than just a collection of individual plants is layering. Tall trees and shrubs in the back, mid-height perennials in the middle, low-growing annuals and groundcovers at the edges. Bloom times staggered so that as one plant finishes, another takes over.
When you’re building your own plant palette, think about these three questions:
- What’s blooming in spring? Summer? Fall? Try to have something in each window.
- What are the heights? Vary them so the eye moves through the garden rather than landing flat.
- What’s doing the long-term work? Make sure your perennials and shrubs anchor the design so the annuals are filling in around a solid foundation, not carrying the whole thing.
A garden that’s been thoughtfully layered feels abundant and alive even between bloom cycles. And that’s exactly what I was after.
Step 4: Planting and Establishment
Having a plant list and actually getting everything in the ground are two very different things. This section is where the vision meets the dirt, and where a lot of gardeners, myself included, learn the most.
I want to be honest about this phase: it’s not glamorous, it’s physically demanding, and in the high desert, timing matters more than almost anywhere else. But it’s also deeply satisfying in a way that’s hard to explain until you’ve done it. There’s something about putting a plant in the ground with your own hands that creates a relationship with it. You notice it differently, you root for it, you feel it when it struggles and celebrate when it thrives.
Here’s how I approached it.
Timing: Working With the Desert, Not Against It
In Ridgecrest, the planting calendar doesn’t look like what you’ll find in most general gardening guides. Our last frost dates, our brutal summer heat, and our dry winters all shift the timing of everything. Getting the timing right isn’t optional here. It’s the difference between plants that thrive and plants that struggle from day one.
For California native plants specifically, the recommended planting window is November. Fall planting gives natives an entire winter and spring to establish their root systems before summer heat arrives, and in the high desert, that head start is everything. Roots that have had months to reach deep into the soil are roots that can handle triple-digit temperatures. Roots that haven’t had that time are working against the clock from the moment summer hits.
I learned this firsthand with my Matilija poppy. I had been dreaming about this plant for years, but I couldn’t find one available until early spring, which meant I missed that ideal fall planting window and lost an entire winter of root development. I planted it anyway, knowing I was starting behind. If you’re looking for a specific native plant, it’s worth sourcing it in fall even if that requires some advance planning or ordering ahead. Don’t lose a winter the way I did.
Wildflower Seeds: A Winter Job
The wildflower seed mix went in during winter, well before any of the transplants. This was intentional. Many wildflower species, especially poppies, need cool soil temperatures to germinate properly. They’re triggered by winter conditions, not spring warmth. Seeding in winter and letting nature take its course is the right approach for most native and desert wildflower mixes.
This year, the timing worked out beautifully. We had good winter rain storms move through, and the natural moisture did what irrigation never quite replicates. It germinated the seedlings gently and evenly across the beds. By spring, the wildflower areas were covered in tiny green seedlings that had established on rainfall alone. If you’re in the high desert and you’re planning a wildflower mix, seed in winter and let the rain do the work. You’ll be amazed at what shows up.
Direct seeding is also the right method for plants like poppies, cornflowers, and coreopsis that develop a taproot early and don’t transplant well. It’s significantly more economical than buying transplants when you’re covering a large area, and the results feel like a small miracle when they come in.
Transplants: Spring Planting With Eyes Open
For everything else, the perennials, shrubs, annuals, and statement plants, I worked in spring, sourcing transplants from nurseries and getting them in the ground as early as conditions allowed.
Here’s what I want to be honest about: spring planting in the high desert means you are racing the heat. By June, we’re already looking at triple digits. That means any transplant going in the ground in April or May has a matter of weeks to establish before it’s hit with the most stressful conditions of the year. It can be done. I did it. But it requires you to show up for your plants every single day during that establishment window.
Watering During Establishment
This is where high desert gardening parts ways with almost every general gardening guide you’ll find. The standard advice to water deeply and infrequently is correct, eventually. But for newly planted transplants going into a Ridgecrest summer, daily watering during establishment isn’t coddling. It’s survival.
When temperatures are already climbing toward triple digits, a newly planted transplant with a limited root system in hot, dry soil needs water every day. The soil surface dries out within hours. Roots that aren’t yet established can’t chase moisture deeper into the ground. Daily watering bridges that gap until roots have had enough time to extend into the surrounding soil and find moisture on their own.
As plants settled in and showed signs of active growth, I gradually stretched the intervals, moving from daily to every few days, then weekly, and eventually to every ten to fourteen days for the most drought-tolerant species. The goal is always to wean plants toward independence, not to keep them dependent on daily irrigation indefinitely.
Planting Process
For each transplant, the process was straightforward but intentional:
- Dig the hole twice as wide as the root ball, and the same depth. In our hard desert soil, loosening the surrounding area matters as much as the hole itself. It gives roots somewhere to go as they expand.
- Amend selectively. Many desert-adapted plants prefer leaner soil. Over-amending with rich compost can encourage lush, soft growth that struggles in heat and drought. I amended based on each plant’s needs rather than applying a blanket approach across the whole bed.
- Set the plant at the right depth. The crown, where the stem meets the roots, should sit at or slightly above soil level, never buried. Burying the crown is one of the most common planting mistakes and leads to rot.
- Water in thoroughly at planting. This first deep watering settles the soil around the roots and eliminates air pockets that can dry out and damage new root growth.
- Mulch around the base, not over it. A layer of mulch retains moisture and regulates soil temperature, but keep it a few inches away from the base of every plant.
What Surprised Me
A few things caught me off guard during this phase that are worth sharing.
The wildflower seeds were more forgiving than I expected. I worried constantly about whether they were germinating, whether I’d seeded too thin or too thick, whether birds had eaten half of them. And then one morning I walked outside and the beds were covered in tiny green seedlings and I felt like I’d witnessed a small miracle. The winter rains had done their job quietly while I wasn’t watching.
The Matilija poppy surprised me in the best possible way. Despite missing its ideal fall planting window, despite going in during spring, despite the challenging establishment conditions, it bloomed in its first year. I wasn’t expecting that, and it felt like a gift. But I also know that what I saw this year is just a preview. Next year, after it has had a full cycle to set strong roots and truly establish itself, I expect it to be something extraordinary. The first year bloom was a promise. I can’t wait to see what it delivers when it’s fully at home.
And the crape myrtles, which I hadn’t touched at all, responded to the relandscape around them in a way I didn’t anticipate. Reduced competition, improved drainage, and fresh mulch around their bases seemed to energize them. This summer they bloomed harder than I’d ever seen. Sometimes the best thing you can do for an existing plant is simply improve the conditions around it.
Practical Tips for the Establishment Phase
- Water transplants daily in summer heat. In the high desert, this isn’t optional during the first weeks. It’s what keeps plants alive long enough to establish.
- Seed wildflowers in winter. Let the rain do the germination work. It’s more effective than irrigation and costs nothing.
- Source native plants in fall. If you have a specific native on your list, plan ahead to find it in November. Don’t lose a winter of root growth.
- Watch your plants, not a schedule. Wilting in late afternoon heat is normal. Wilting in the morning means the plant needs water. Learn the difference.
- Don’t panic over transplant shock. Many plants drop leaves, look sad, or stall for a few weeks after planting. Give them time before assuming something is wrong.
- Keep a simple log. Note what you planted, where, and when. In six months you’ll be glad you did, especially for anything that goes dormant and disappears underground.
The establishment phase asks you to be attentive without being anxious, to care for your plants without hovering. It’s a practice in patience that every gardener has to develop, and the high desert has a way of teaching it quickly.
The Payoff: Summer Bloom Season
There is a moment in every garden project where the work stops feeling like work and starts feeling like magic. For me, that moment came this summer.
I want to take you back to the before for just a second, because the contrast matters. A year ago, this was the yard I avoided looking at. Bermuda grass threading through river rock, weeds filling every gap, no color, no life, no sense that anyone had ever loved this space. It was a yard that had given up. And honestly, for a while, so had I.
Standing in that same front yard this July is a completely different experience.
The Crape Myrtles
Let’s start with the crape myrtles, because they are the ones that truly stopped me in my tracks this summer. These trees were here before the redesign. I didn’t plant them, I didn’t move them, I barely touched them. What I did was clear the competition around them, improve their drainage, and give them fresh mulch and room to breathe.
And they responded like they’d been waiting years for someone to notice them.
The bloom this summer was unlike anything I’d seen from these trees before. Full, heavy clusters of flowers that came in and just didn’t stop. Color that you could see from the street. The kind of display that makes neighbors slow down as they drive by. It was a reminder that sometimes the most powerful thing you can do for an existing plant isn’t to replace it. It’s to finally give it what it needs.

The Matilija Poppy
I have wanted a Matilija poppy in my yard for years. And this spring, even though I planted it late, even though it missed its ideal fall window, even though it had every reason to spend its first season just quietly getting its roots together, it bloomed.
The flowers are enormous. White, crinkled petals surrounding a center of bright gold, each one looking like a fried egg the size of your hand. There’s nothing subtle about a Matilija poppy in bloom, and that’s exactly why I love it. It’s a California native that grows wild in the canyons and chaparral, and seeing it thriving in my front yard in Ridgecrest feels like bringing a little piece of that wildness home.
And here’s the thing: what I saw this year was just the beginning. The Matilija poppy is a plant that gets better every year as its root system expands and deepens. This first bloom was a preview, a promise of what’s coming. I am already looking forward to next summer in a way I haven’t looked forward to a season in a long time.

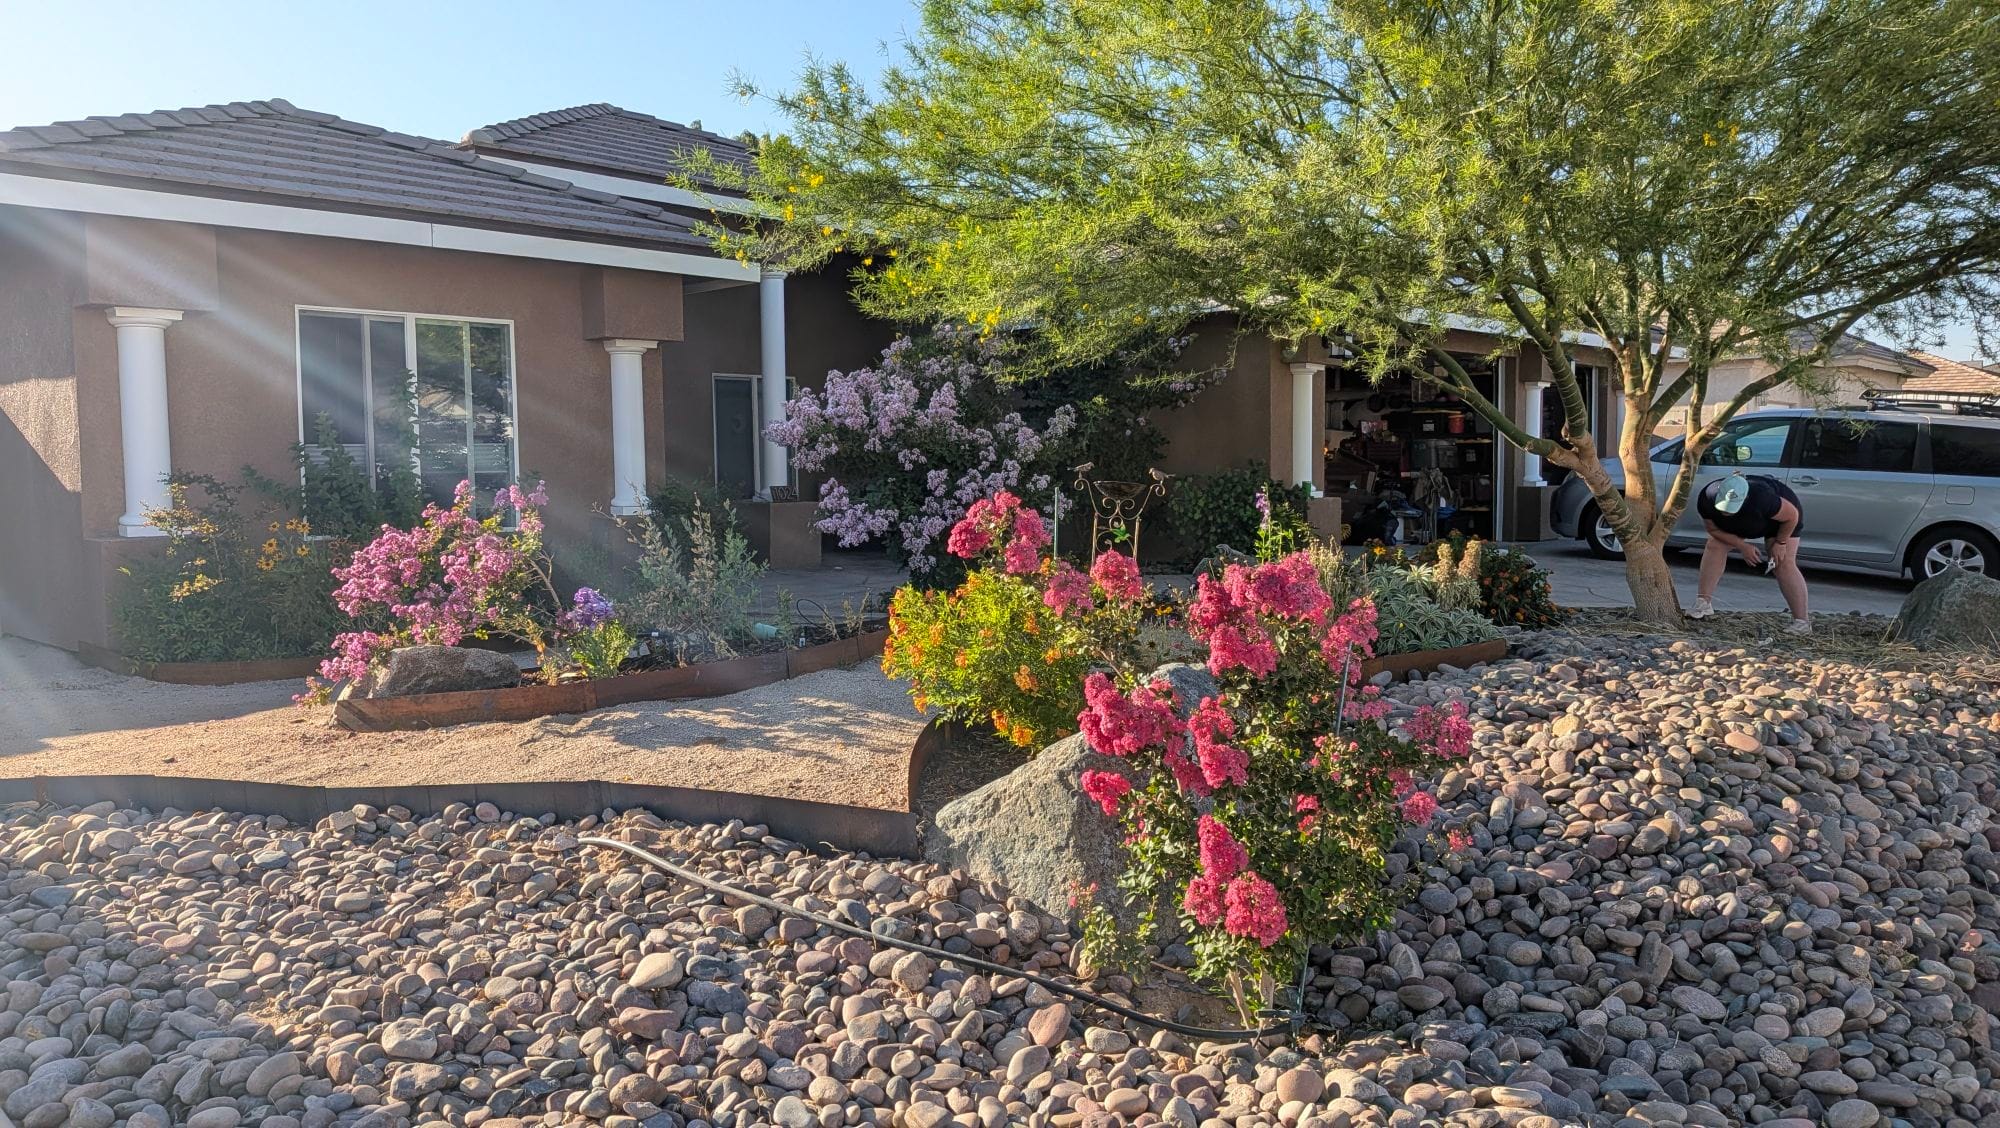
The Wildflower Beds
The wildflower areas came in exactly the way I had hoped, naturalistic, layered, abundant. Poppies in orange and sherbet pink. Cornflowers in deep cobalt. Rudbeckia and coreopsis in warm gold. Gaillardia in fiery red and orange. All of it woven together in a way that looks less like a planted garden and more like something that simply decided to be beautiful here.
There’s a particular quality of light in the late afternoon in the high desert, low and warm and golden, and when it hits a bed full of wildflowers, it does something extraordinary. This summer I have stood in my front yard at that hour more times than I can count, just taking it in.
The Design Coming Together
It’s one thing to imagine how a design will look. It’s another to see it actually working.
The Corten edging caught the summer light and deepened into exactly the warm, rusty tones my husband had always envisioned. The decomposed granite paths pulled the whole palette together, warm and earthy and natural, connecting the beds without competing with the plants. The boulders that I couldn’t move, that felt like obstacles during the planning phase, turned out to be some of the most characterful elements in the whole yard. They anchor the beds, they give the space a sense of permanence, and they look like they belong there, because they do.
The free-form beds that grew out of the walkway planning have exactly the organic, flowing quality I was after. Nothing feels rigid or forced. The yard moves.

What This Yard Feels Like Now

I pull into the driveway and I want to look at my yard. That sounds like a small thing. It is not a small thing.
There is color in July in the high desert, real, abundant, saturated color, in a yard that a year ago had none. There are pollinators working the beds from morning until the heat peaks. There are hummingbirds at the Tecoma orange bells. There are butterflies on the zinnias and marigolds. The yard is alive in a way that feels almost loud compared to what it was.
And underneath all of it, doing its quiet work in the soil, the cardboard is breaking down. The roots are reaching deeper. The perennials that look good this year will look extraordinary next year. The Matilija poppy is just getting started.
This is what a freshly relandscaped yard looks like in its first summer. And if this is the beginning, I can’t wait to see what it becomes.
What I’d Do Differently
No garden project goes perfectly. And I think one of the most valuable things a gardener can share isn’t just what worked. It’s what they’d do differently with the benefit of hindsight. So here’s my honest reflection on this project, offered in the spirit of helping you avoid the same learning curves.
Start Sourcing Plants Earlier, Especially Natives
This one I already mentioned, but it bears repeating because it genuinely changed the trajectory of one of my most anticipated plants. If you have a specific native plant on your list, start looking for it in late summer or early fall so you’re ready to plant in November. Don’t assume you’ll find it when you need it. Specialty natives like the Matilija poppy aren’t always available at every nursery, and waiting until spring means losing an entire winter of root development, the most valuable establishment time a native plant has in our climate.
Make a list of your must-have plants before the fall planting window opens, and source them intentionally rather than hoping they’ll be on the shelf when you’re ready.
Remove the Landscape Fabric: All of It
The yard came with landscape fabric already in place, and before I laid a single piece of cardboard or planted anything, I ripped it out everywhere I was putting new beds and paths. This was the right call and I’d do it again without hesitation.
Landscape fabric is one of those products that sounds like a great idea and causes problems over time. It breaks down unevenly, it traps bermuda grass rhizomes between layers, and it eventually becomes a tangled mess that makes future planting and maintenance harder than it needs to be. Getting it out before you start gives you a clean foundation and makes the cardboard sheet mulching method far more effective. Cardboard laid directly on soil works with your garden ecosystem in a way that landscape fabric never does.
If your yard has existing landscape fabric and you’re planning a relandscape, don’t work around it. Pull it out first. You’ll thank yourself later.
Give Yourself More Time on the Clearing Phase
I did my best with the bermuda grass removal, and I made peace with the fact that I didn’t get every root. But looking back, I would have given myself more time in that phase, working more slowly through the river rock, being more methodical about following rhizomes, and not rushing toward the planting phase while roots I’d missed were still viable in the soil.
The clearing phase is the least exciting part of the project. It’s tempting to move through it quickly so you can get to the parts that feel more like gardening. But every rhizome you leave behind is future work. Take the time.
Update Your Irrigation Before You Plant
The yard already had an existing irrigation system in place, which was a significant advantage. I didn’t have to start from scratch. But I did make one important upgrade before planting: I switched out the bubblers for drip line throughout the new beds.
This change made a real difference. Bubblers deliver water in a concentrated burst at one point, which can cause runoff and uneven distribution in a planted bed. Drip line delivers water slowly and directly to the root zone of each plant, which is more efficient, reduces evaporation, and does a much better job of supporting individual plants across a larger bed. In a high desert garden where every drop of water counts, drip irrigation isn’t just a convenience. It’s the right tool for the job.
If you have an existing irrigation system and you’re relandscaping, take the time to evaluate it before your plants go in. Swapping bubblers for drip line is a relatively simple upgrade that pays off immediately in plant health and water efficiency.
Plan for Irrigation Changes Before the Beds Are Planted
Even with an existing system to work from, I’d encourage anyone relandscaping to think through irrigation adjustments early in the process, before beds are planted and paths are laid. Making changes after everything is in place is doable, but it’s more disruptive than getting it right from the start. Walk your system, know where your lines run, and plan your drip placement alongside your bed layout rather than after the fact.
Embrace the Phased Approach
This one is less a regret and more a reframe. When you have a full vision in your head, there’s a natural pull to execute all of it at once, to get every bed planted, every path laid, every plant in the ground in one ambitious push. I understand that impulse completely.
But a garden doesn’t have to be finished to be beautiful. Some of my beds are still filling in. There are spots where I’m still deciding what wants to live there. And that’s okay. Giving yourself permission to do this in phases, to plant what you know, leave room for what you’re still discovering, and let the garden tell you what it needs as it grows, takes the pressure off and actually leads to better decisions.
The yard I have today is better than the yard I would have had if I’d rushed to fill every inch of it last spring. Some of the best plant choices came from walking through a nursery with open eyes, not from a list made before I’d ever seen what was available.
Trust the Process Even When It Looks Rough
There is an awkward phase in every garden transformation where it looks worse than it did before you started. The old stuff is gone, the new stuff isn’t established yet, and you’re standing in a yard full of small plants and bare soil wondering if you made a terrible mistake.
I had that moment. Most gardeners do.
Push through it. What looks sparse in April looks abundant in July. What looks uncertain in the first season looks established and intentional in the second. The garden you’re building takes time to become itself, and the awkward in-between phase is just part of the process, not a sign that something went wrong.
Your Turn: How to Start Your Own Front Yard Makeover
If you’ve read this far, I’m guessing your yard is somewhere in the before stage, or maybe you’re right in the middle of a transformation of your own, knee-deep in bermuda grass and big ideas. Either way, this section is for you.
Because here’s what I want you to take away from everything I’ve shared: this is doable. A full DIY front yard relandscape, from overgrown mess to blooming, intentional desert garden, is within reach for any gardener willing to show up for it. It takes time, physical effort, and a tolerance for the awkward in-between phases. But it does not require a landscape architect, a large budget, or any prior experience beyond a willingness to learn as you go.
Here’s how to start.
Step 1: Walk Your Yard Before You Touch Anything
Before you pull a weed or buy a single plant, walk your yard with fresh eyes. Notice where you naturally move. Identify what’s worth keeping: existing trees, established shrubs, boulders, anything with years of root development behind it. Take photos from the street, from the driveway, from your front door. These are the views that matter most and they’ll guide every design decision you make.
Step 2: Plan Your Walkways First
Map out where you need to walk, to reach plants for maintenance, to get to the gate, to move through the space naturally. Your walkways are the skeleton of your design. Everything else, the beds, the edging, the plants, grows out of where the paths go. Get this right before you think about anything else.
Step 3: Deal With What’s There
Remove landscape fabric. Clear the weeds and grass as thoroughly as you can, knowing you won’t get everything and that’s okay. Work methodically and give this phase the time it deserves. The quality of your clearing work is the foundation everything else is built on.
Step 4: Define Your Beds and Paths
Once the space is cleared, define your planting beds with edging and lay your paths. This is where the yard starts to look like something. Whether you choose Corten steel like I did, a different metal edging, or natural stone, pick something that fits your climate and your aesthetic and commit to it. Then fill the paths with decomposed granite, gravel, or whatever hardscape suits your vision.
Before any plants go in, lay cardboard across your bed surfaces to smother any remaining weed seeds and rhizomes. This step costs almost nothing and does an enormous amount of quiet work in that first year.
Step 5: Update Your Irrigation
Before you plant, evaluate your irrigation. If you have an existing system, walk it and make any necessary adjustments: swapping bubblers for drip line, repositioning emitters, adding new zones if your bed layout has changed significantly. Getting irrigation right before plants go in is far easier than trying to adjust it after.
If you don’t have an existing system, a simple drip irrigation setup is more affordable and accessible than most people expect, and in a high desert garden it’s worth every penny.
Step 6: Seed Your Wildflowers in Winter
If wildflowers are part of your vision, and I’d encourage you to consider them if they’re not, get your seed mix in the ground in winter. Scatter it across your prepared beds, lightly rake it in, and let the winter rain do the germination work. Don’t overthink it. Wildflowers are remarkably forgiving if you get the timing right.
Step 7: Source Native Plants in Fall
Make a list of any California natives or desert-adapted plants you know you want, and start looking for them in late summer so you’re ready to plant in November. The fall planting window is the single biggest advantage you can give a native plant in our climate. Don’t lose it by waiting until spring.
Step 8: Plant Everything Else in Spring, and Show Up Daily
Get your transplants in the ground in spring, as early as conditions allow, to give them as much establishment time as possible before summer heat arrives. Then water daily during that critical establishment window. In the high desert, this isn’t optional. It’s what keeps your plants alive long enough to find their footing.
Wean them gradually toward independence as they establish, stretching watering intervals as roots develop and plants show signs of active growth.
Step 9: Be Patient With the First Season
Your garden will not look finished in year one. Some plants will take off immediately and others will spend the whole season quietly putting down roots. There will be gaps. There will be plants that surprise you and plants that disappoint you. There will be an awkward phase where you wonder if it’s all coming together.
It is. Stay with it.
A Resource to Help You Plan
If you’re in the early stages of planning a high desert garden and you want a structured way to think through plant selection, seasonal timing, and bed layout, my High Desert Garden Planner was built exactly for this. It walks you through the decisions I’ve described in this post in a format you can work through at your own pace, with the specific context of our desert climate built in.
It’s the tool I wish I’d had when I was standing in my overgrown front yard trying to figure out where to start.
Conclusion
I want to take you back to that driveway one more time.
Not the one I pull into now, with the crape myrtles in full bloom and the wildflower beds catching the afternoon light and the Matilija poppy making its quiet, extraordinary promise for next summer. The other one. The one where I’d trained myself to look straight ahead and walk inside without really seeing the yard, because seeing it meant feeling the weight of everything it could be and wasn’t.
If you’re in that feeling right now, I want you to know: the yard isn’t waiting for a better version of you. It’s just waiting for a plan.
One decision leads to the next. Walk the space. Map the paths. Clear the grass. Lay the cardboard. Seed the wildflowers. Source the plants you’ve been dreaming about. Show up every day with the hose during that brutal first stretch of summer heat. And then one morning in July, walk outside and find that the yard you imagined has quietly become the yard you have.
It won’t be perfect. Mine isn’t. But what I have now is a front yard that reflects what I actually believe: that the high desert isn’t a limitation to garden around, it’s a landscape to garden with. That with the right plants and the right structure, beauty doesn’t just survive here. It thrives.
Beauty grows here, even in the heat.
If you’re ready to start, grab the High Desert Garden Planner on my products page, and I’d love to see your before photos when you begin.

Leave a Reply